
If you’ve ever wondered why a professional paint job looks so much smoother and more uniform than a DIY attempt, the answer almost always comes down to one thing: prep. Knowing how to prep walls for painting properly is the single most important skill that separates a paint job that looks great for years from one that starts peeling and looking worn within months. In this guide, we’ll walk you through every step so you can approach your next project like a pro.
Why Wall Preparation Matters So Much
Paint is not a miracle product. It won’t fill in cracks, cover stains, or stick to dirty or glossy surfaces on its own. When you learn how to prep walls for painting correctly, you’re creating a clean, smooth, stable surface that the paint can bond to properly. Additionally, good prep ensures the finished product looks smooth and even — not like you can see every imperfection through the paint.
Step 1: Clear and Protect the Room
Before you touch any walls, remove as much furniture as possible from the room or move it to the center and cover it with drop cloths. Similarly, remove switch plates, outlet covers, light fixtures, and wall décor. Then use painter’s tape on all trim, ceiling edges, and baseboards. This is a step many homeowners skip in a hurry — but it saves significant cleanup time afterward.
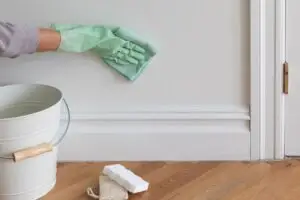
Step 2: Clean the Walls Thoroughly
Dirty walls are one of the most common reasons paint peels prematurely. Before painting, wash all walls with a mild soap solution or a TSP (trisodium phosphate) substitute cleaner. Pay special attention to kitchen walls (greasy) and areas around light switches (finger oils). Furthermore, bathrooms often have soap residue or mold that must be addressed before painting. Allow the walls to dry completely — at least 24 hours — before proceeding.
Step 3: Repair All Holes, Cracks, and Damage
This is where knowing how to prep walls for painting really makes a visual difference. Use spackling compound for small nail holes and minor dings. For larger cracks or areas of damaged drywall, use setting-type joint compound, which is stronger and less prone to shrinkage. Apply the compound with a putty knife, allow it to dry completely, and then sand it smooth. Moreover, if you have water stains or moisture-related damage, address the underlying moisture problem before painting — otherwise the stains will bleed through even fresh paint.
Step 4: Sand the Walls
After repairs have dried, sand the patched areas until they’re flush with the surrounding wall. Use 120-150 grit sandpaper for this work. Additionally, lightly sand the entire wall surface if the existing paint has visible sheen (like semi-gloss or gloss) — this gives the new paint something to mechanically bond to. After sanding, wipe down all surfaces with a tack cloth or damp rag to remove all dust before painting.
Step 5: Apply Primer
Primer is often the step homeowners most want to skip — but it’s also one of the most important parts of how to prep walls for painting. Apply primer over any patched areas, over new drywall, over stains, and over very dark colors that you’re painting lighter. A quality PVA primer or shellac-based primer over stains will seal the surface and give your paint coat better adhesion and coverage. As a result, you’ll often need fewer coats of paint and the finish will look more uniform.
Step 6: Caulk the Gaps
Run a bead of paintable caulk along the joints where walls meet trim, ceiling, and baseboards. Even small gaps in these areas allow dust and insects to enter, and they also make the finished paint job look unprofessional. Use a latex paintable caulk and smooth it with a wet finger. Allow it to dry for the time recommended on the packaging before painting over it. This small step makes a big difference in how polished the final result looks.
Common Wall Prep Mistakes to Avoid
- Painting over dirty walls — even light dust can prevent proper adhesion.
- Skipping primer on bare drywall — the paint will absorb unevenly and look splotchy (called “flashing”).
- Not allowing patches to fully dry — wet compound cracks when painted over and creates visible bumps.
- Using too much caulk — apply a thin, controlled bead and smooth it before it dries.
- Forgetting to sand patched areas — raised patches show through even multiple coats of paint.
When to Call In the Pros
Understanding how to prep walls for painting is valuable knowledge — but some situations are better handled by professionals. Extensive drywall damage, water-stained ceilings, lead paint remediation, or rooms with multiple complex repairs are all situations where a professional painter will save you time and deliver better results. Read our
DIY vs. professional painting comparison, or check out
our full home prep guide for more tips. AltaVista Painting Pro serves homeowners in Carmel, Westfield, Fishers, and Indianapolis.
Contact us today for a free estimate — we handle all the prep, so you don’t have to. For additional guidance, visit the
Family Handyman’s guide to prepping walls for painting.
Quick Summary: How to Prep Walls for Painting
To prep walls for painting, follow these steps in order. First, clear and protect the room. Next, clean the walls to remove dust and grease. Then patch holes, sand rough spots, and caulk gaps. After that, wipe away sanding dust and apply painter’s tape. Finally, prime any patched or stained areas before you paint. Good prep is the single biggest factor in a smooth, long-lasting finish.
Frequently Asked Questions About Prepping Walls for Painting
Do you really need to prep walls before painting?
Yes. Skipping prep is the most common reason DIY paint jobs fail. Clean, smooth, primed walls help paint bond properly and look even. Without prep, you may see peeling, streaks, and bumps within months.
How do you clean walls before painting?
Wipe walls with a sponge and a mix of warm water and mild dish soap. For kitchens and bathrooms, use a degreaser to remove cooking residue and soap film. Rinse with clean water and let the walls dry fully before you paint.
Should you sand walls before painting?
Light sanding helps in most cases. Sand glossy surfaces and any patched spots so the new paint can grip the wall. A fine-grit sanding sponge works well for interior walls. Always wipe away the dust afterward.
Do you need to prime walls before painting?
Prime walls when you patch holes, cover stains, paint over a dark color, or paint new drywall. Primer seals the surface and gives you a uniform base. For a simple refresh in the same color, a quality paint-and-primer product may be enough.
How long does it take to prep a room for painting?
Prepping an average room takes two to four hours, depending on the wall condition. Rooms with major repairs, heavy grease, or lots of trim take longer. Professional painters often spend more time on prep than on the painting itself.
Get Professional Wall Prep in Carmel and Indianapolis
Prepping walls correctly takes time, the right tools, and a careful eye. If you would rather skip the work, AltaVista Painting Pro handles every step for homeowners in Carmel, Westfield, Fishers, and Indianapolis.
Contact us today for a free estimate, and we will make sure your walls are prepped and painted right the first time.
